Design + Documentation
Design and documentation is where ideas are tested, resolved, and translated into something that can actually be built — turning concept into clear, coordinated information.
This stage is central to how I work. It’s where layouts are refined, materials are resolved, and key decisions are made early — creating a clear path forward rather than leaving things to be figured out on site.
Updating a school to meet modern demands is no small task. Learning environments evolve—not just in how they look, but in how they function. This fast-paced project moved quickly from planning to implementation, with students transitioning into their new classrooms soon after completion. As a result, gathering images has been a challenge, and I am working to share what I can while maintaining privacy.
Much of my work centred on resolving the project through documentation—carefully refining plans, layouts and decisions to bring the vision into a buildable form.. This process involved reviewing spaces, reconfiguring layouts, and amalgamating libraries to make room for new classrooms. But it was about more than just aesthetics; it was about accommodating new technologies, upgrading staff areas, and designing a mix of custom and off-the-shelf joinery to meet practical needs.
This way of working—resolving layouts, materials and key decisions before anything is built—has been shaped over time, influenced by early exposure to construction and time spent on site understanding how things come together. I’ve written more about this in Builder’s Daughter.
Design can be messy—it’s not always the polished images you see online or in print. Instead, it's an evolving process, full of iterations and adjustments to create functional, thoughtful spaces. I will do my best to explain the process below.
Resolving the Design Before Construction
Documentation is what allows a project to be resolved before construction begins, especially one as complex as reconfiguring areas within a large education complex. It allows ideas to be tested and refined before any physical work begins. For this project, I developed a series of drawings to test and resolve the design, including:
Detailed floor plans
Sections and elevations
Custom joinery designs
These drawings ensured that every element was both practical and aligned with the school’s vision. Drafting enabled me to explore multiple layouts and refine the design before implementation.
The Scope of This Project
While existing plans provided a starting point, buildings evolve over time. To create accurate designs, I took detailed on-site measurements, including:
Overall dimensions
Ceiling and windowsill heights
Power outlet placements
Structural elements and obstructions
These measurements not only informed the design but also provided valuable insights into how the spaces were being used. It also ensured the design was grounded in the reality of how the spaces were used day to day. Throughout the process, I worked closely with the client to ensure the design aligned with the school’s needs and budget.
The Iterative Process – From Concept to Final Drawings
This project involved multiple stakeholders, each with unique needs. . This process allowed the client to clearly understand how the spaces would function before anything was built. Each revision brought new insights, leading to adjustments based on feedback.
This sits within a broader design process that moves from concept through to a resolved outcome, which I’ve outlined further in Behind the Scenes: My Design Process.
Key steps in the process included:
Initial concepts – Exploring various layout options
Client feedback – Refining the designs based on needs and constraints
Final drawings – Ensuring optimal functionality and alignment with the school’s long-term vision
The final design balanced practicality with future flexibility, ensuring every square meter was used efficiently.
Balancing Custom and Off-the-Shelf Solutions
Designing within a school requires a thoughtful balance between custom and off-the-shelf solutions:
Custom joinery – Ideal for specialised storage, integrated technology, and spatial constraints
Off-the-shelf furniture – Provides flexibility and cost efficiency
By strategically investing in custom elements where they had the most impact, we were able to create a cohesive, practical environment that met operational needs while staying within budget.
Reflection on the Process
Looking back, the most rewarding part of this project was seeing the design evolve from sketches to functional spaces. The complexity required flexibility and constant collaboration with the school team, contractors, and stakeholders. Drafting played a crucial role in:
Testing ideas before committing to construction
Refining the design to meet evolving needs
Creating a roadmap for a seamless implementation
This stage of the process is essential, yet often overlooked. It transforms abstract ideas into actionable plans, ensuring that spaces not only meet today’s needs but are also adaptable for the future. This project reinforced that good design is more than just aesthetics—it’s about shaping enduring, functional solutions.
It’s often the smaller decisions, resolved early, that have the greatest impact on how a space works. I’ve written more about this in Small Decisions, Resolved Spaces, where a single layout change significantly shifted how a kitchen functions.
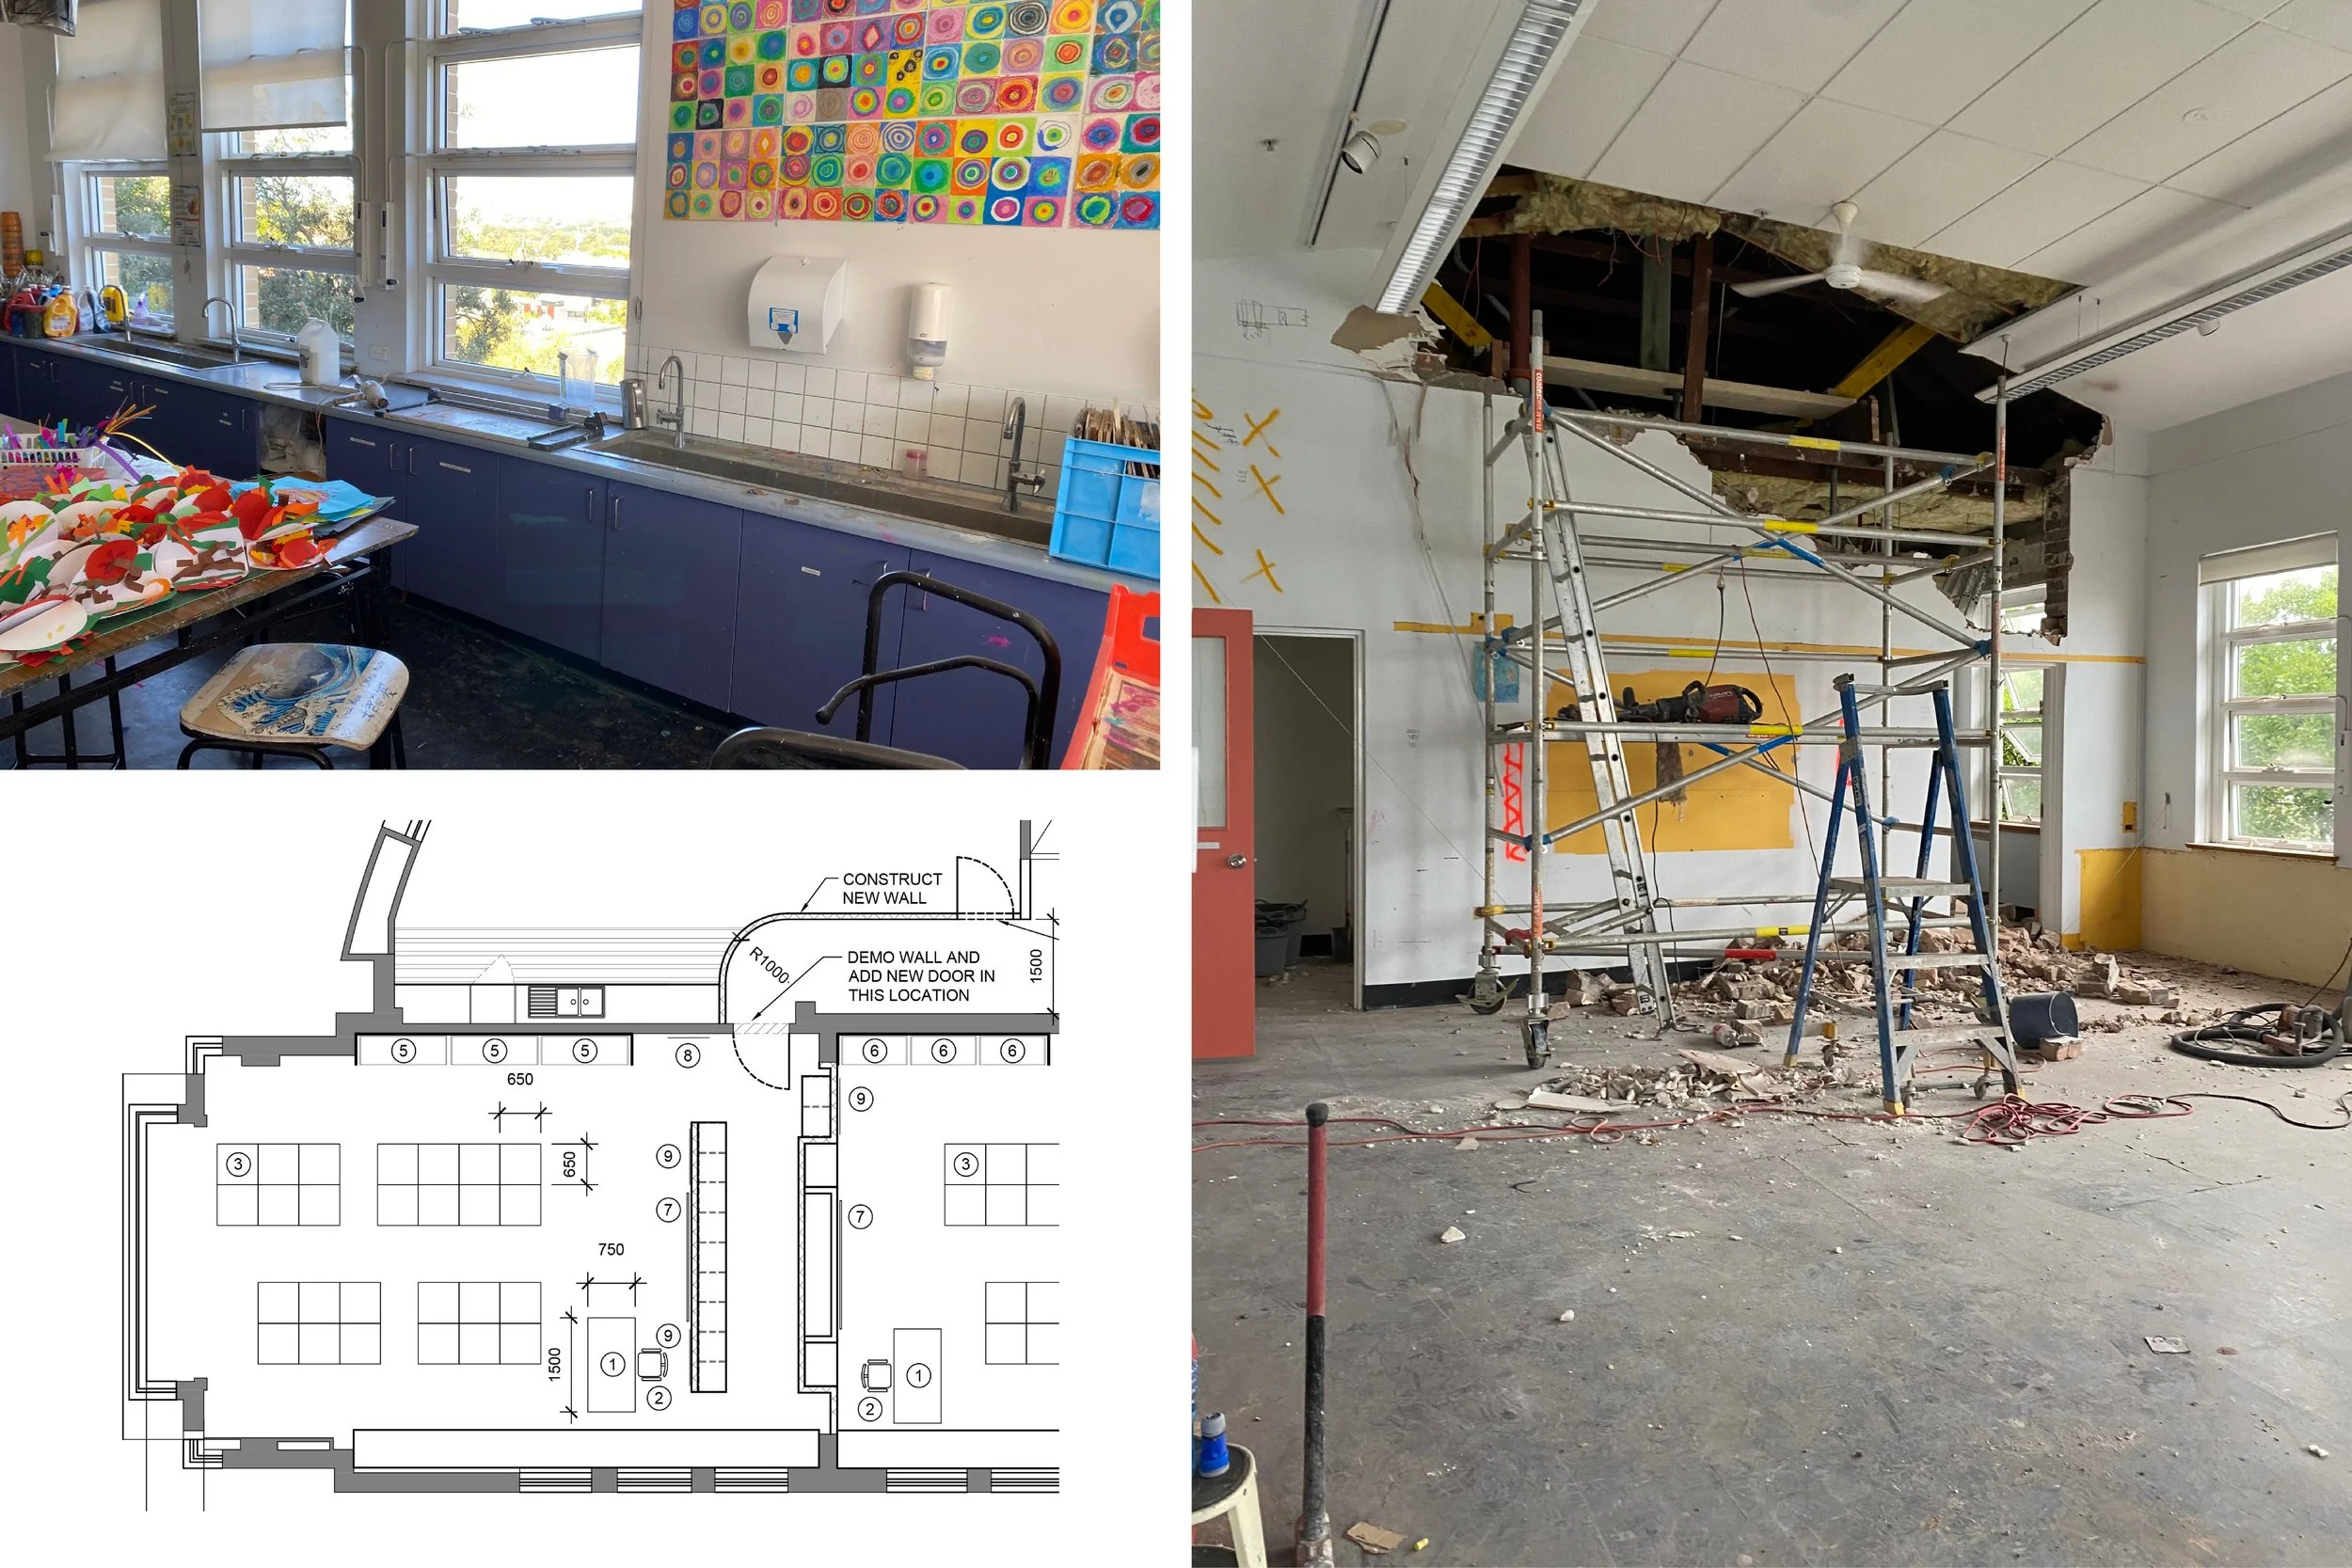
Before and after: An art room transformed into two classrooms, with a new wall added for cubby storage on one side and interactive media wall on the other side. With the addition of a doorway created from the existing staff room, the existing staff kitchen needed to be updated.

New classroom ready to be moved into! (Cubbies on rollers to be tucked in under the joinery on the left. New joinery under the windows on the right allows for plenty of storage… one of the big requests!

Before and during: The old kitchen removed, and a new door installed.

New staff kitchen: Designed for multiple users throughout the day, I divided the space into a cooking side and a snack side. Some construction challenges required adjustments along the way. (And despite the lighting in the final shots, the kitchen is all one color—Laminex Parchment.)
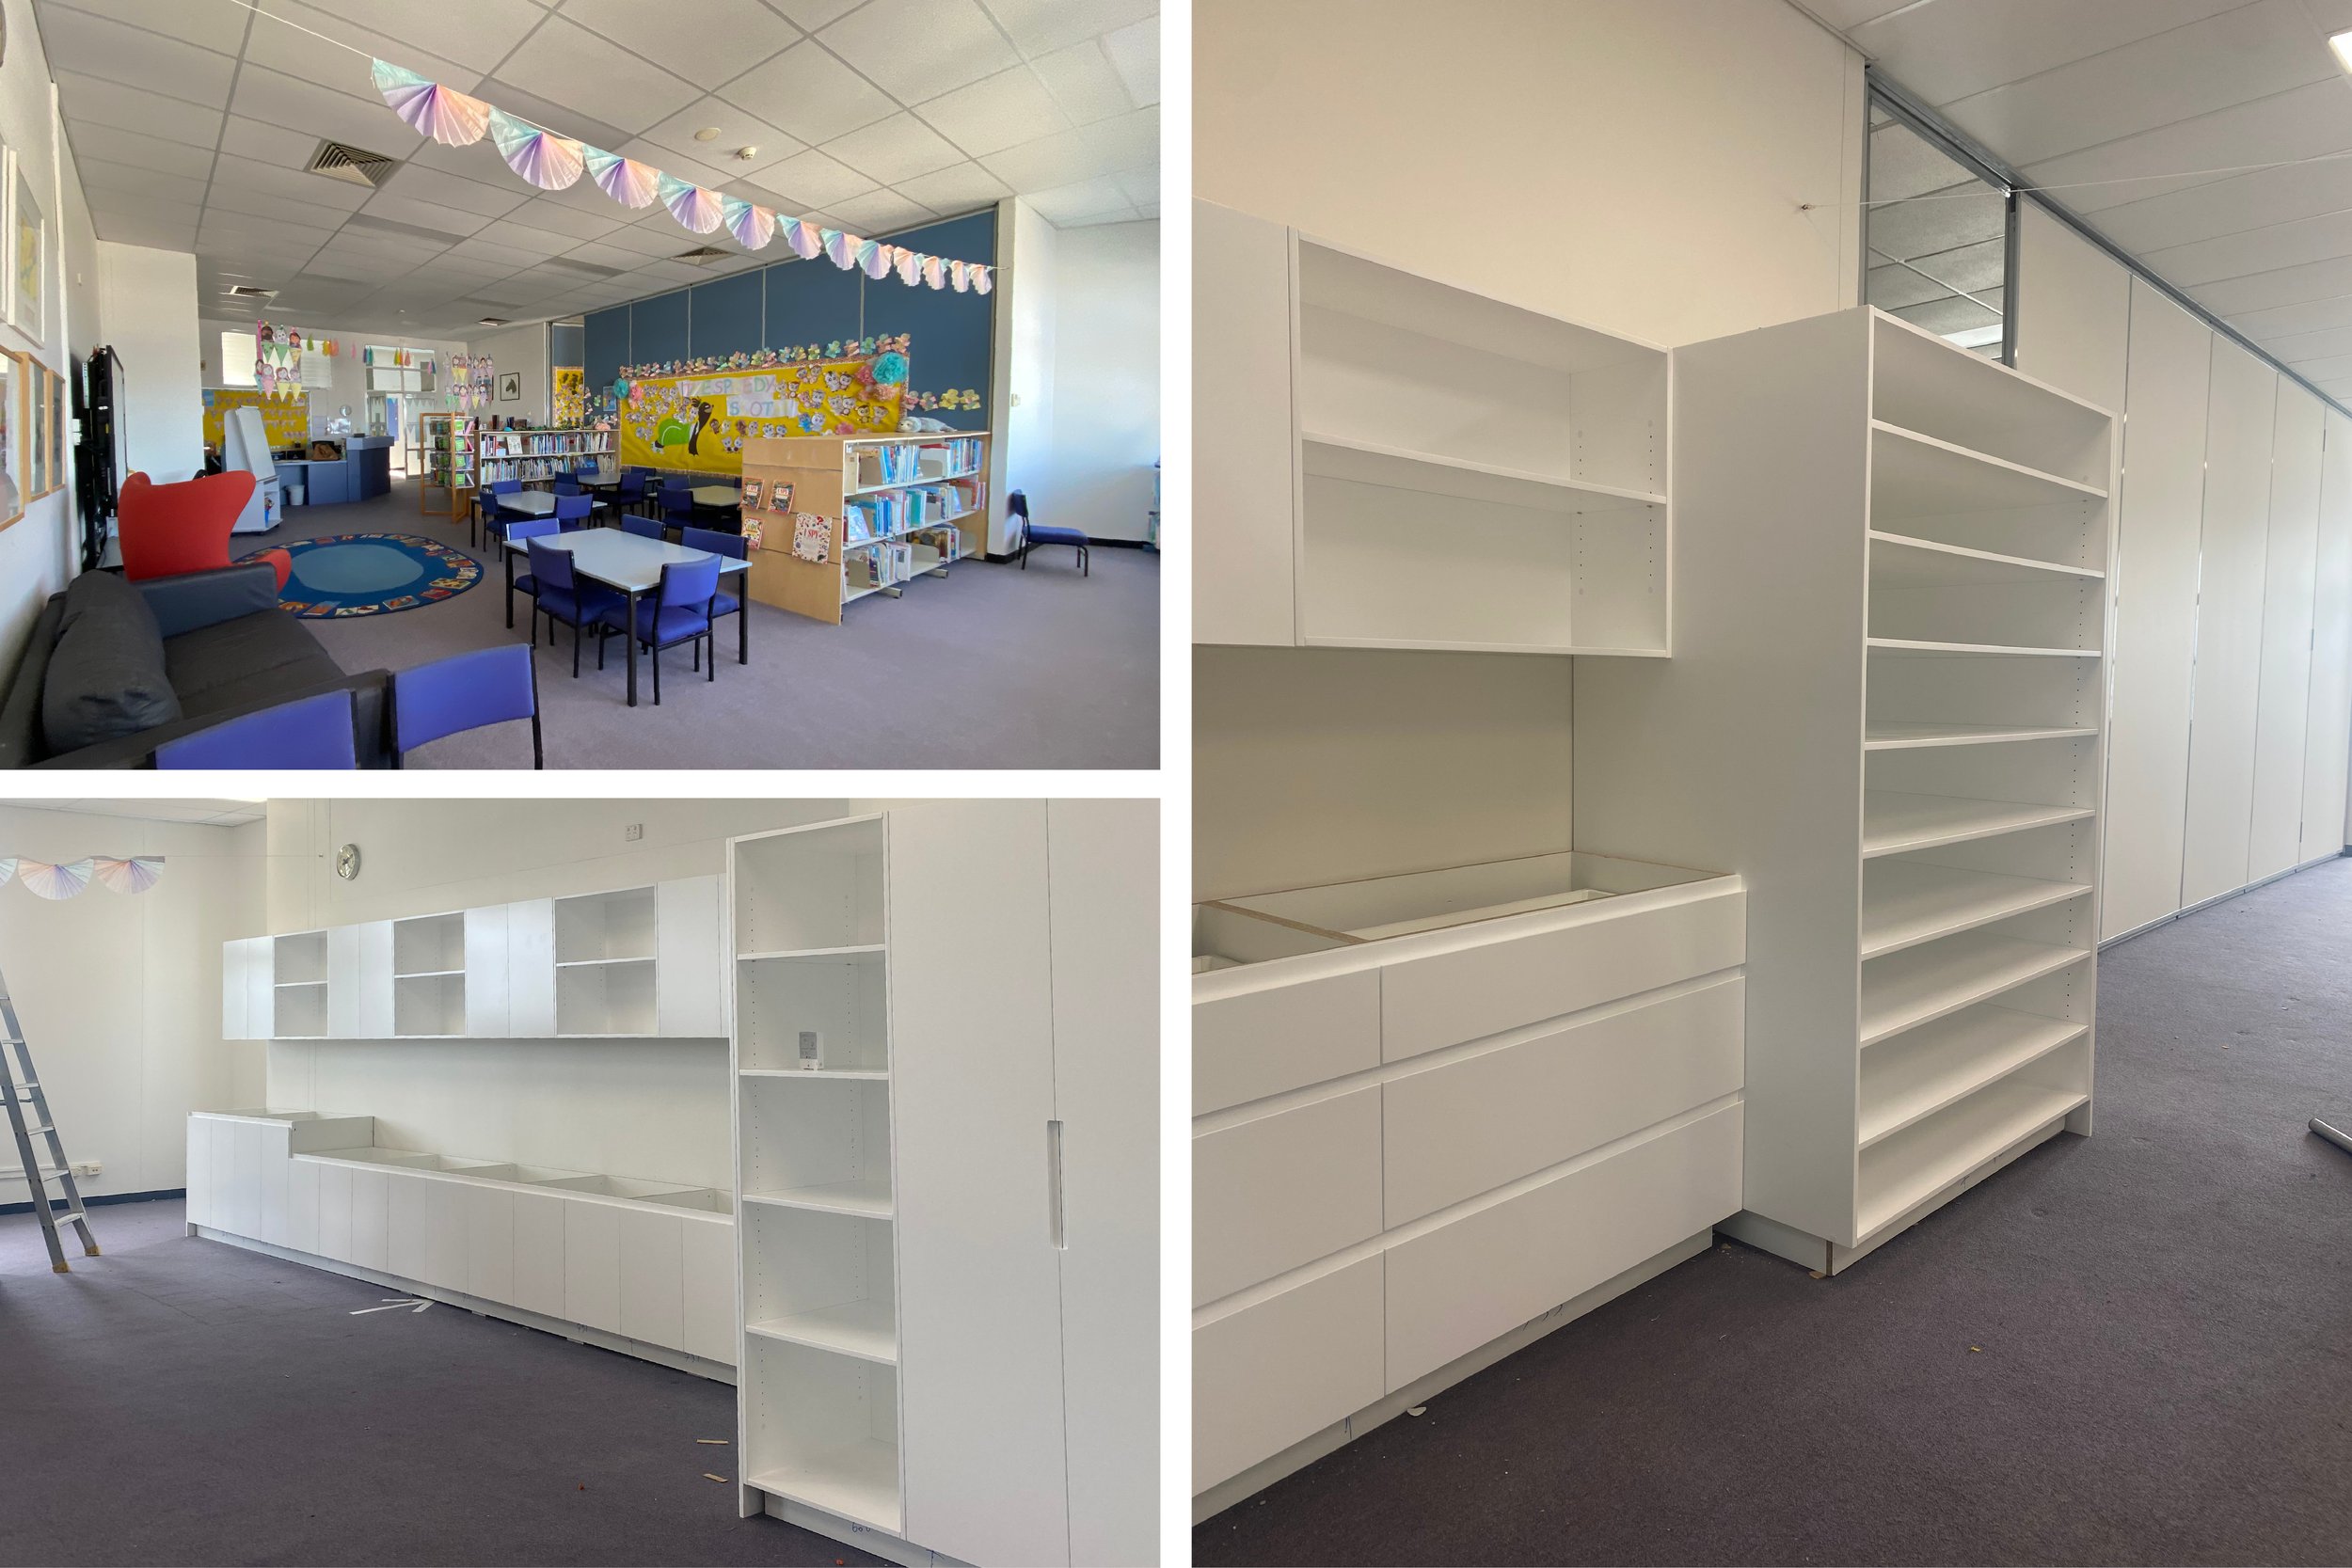
Before and during: The art room was relocated to the old library. A bank of sinks will be installed along the wall. The image on the right shows additional joinery, including a tower for storing large artworks flat.
© Donna Vercoe. All rights reserved. Images, including CAD drawings, Nikon DSLR, and iPhone photographs, are the property of Donna Vercoe.